Hi everybody. I hope you guys are having a blast. One thing that I’ve been aware lately is the desire to quickly deploy a WordPress installation. Now, I understand that for advanced developers you can have WordPress multisites and deploy them extremely fast and with less restrictions than what I am going to explain here. This post is for beginners.
This post is written for either the developer that has never used WordPress or for the graphic designer that slowly is making the transition into the web. At some point you are going to want to deploy your own websites with a CMS and probably you should consider WordPress.
So let’s get to it:
1. Go ahead and download the latest version of WordPress from the WordPress.org site. IMPORTANT: If however, you have a hosting plan that includes WordPress installations as part of their Fantastico plans, then you may skip this altogether. Just visit your Control Panel (Cpanel) and click in the software link. Then follow the instructions and voila. You are done my friend. Continue reading if you don’t have the one click installation though.
2. The download is going to contain a zip file. Go ahead and decompress the file and open the resulting folder.
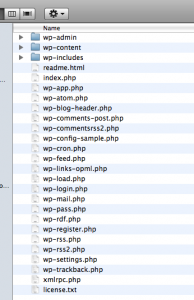
3. As you can see in the image below the resulting folders and files together form the WordPress platform.
4. In order for this files to work they need to be rendered by a web server. I am not going to go into the details of configuring a web server, however I recommend that you look into MAMP (for Mac) or WAMP (for PC) and try installing the Apache in your local machine. MAMP stands for Mac OS, Apache, MySQL and PHP.
5. Once you move your files to a folder accessible by your web server, you should just visit the new created folder in your browser. In my case, I have MAMP installed in my machine and I will be using Firefox as my browser.
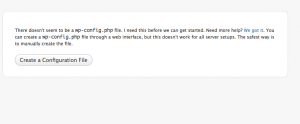
6. By visiting the newly-created folder in Firefox, you get a page that basically warns you that the wp-config.php file hasn’t been created yet. It also gives you the opportunity to try to create the file directly from your browser.
7. Click on the button that says “Create configuration file”.
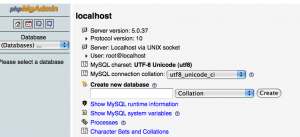
8. Before we move forward, you will need to create a database. A MySQL database is needed in order to run your WordPress installation. The easiest way to create this database is to use PHPmyAdmin. PHPmyAdmin is a web application that present a friendly platform for managing the MySQL databases that you have created in your host machine.
9. Visit the PHPmyAdmin platform and create a database by just entering a database name in the appropriate box (see image).
10. You may also need to create a user for that database. If so, go ahead and assign a username and password and finally assign all privileges for that user within the database. In my case, since I am using a local server in my machine then MAMP automatically creates a username that defaults to “root” and also the password’s default is “root”. But if you are installing WordPress into an online property make sure that the username and password are not ROOT!
11. Fill out the details of your database in the WordPress install. The setup configuration window is going to ask for the database name, username, password and host. Most of the times the host is “localhost”.
12. Finally click where it says: “RUN THE INSTALL” and hold your breath.
13. WordPress will make the connection to your MySQL database and install the necessary tables in that database.
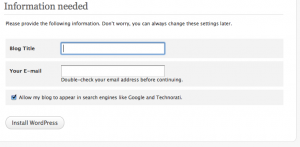
14. The installation is going to ask for two things: The Blog title (this can be changed later) and the email address: (this can be changed later as well), however make sure that the email for now is a valid email address.
15. Finally hit “Install WordPress”.
16. If successful, the installation will give you the password for the admin user. YOU NEED to write this down! Make sure that you keep this information, you are going to need it to login for the first time into your site.
17. Log in for the first time into your WordPress Admin Platform and change the password by following the instructions.
18. That is it! Now you can add pages and posts and they automatically will be added to your new blog!
What about installing it from the command line?
If you are familiar with the command line in Linux, you may not want to use the GUI in order to install WordPress. Some hosts provide WordPress in the Command Line or WP-CLI for short. With Wp-CLI, you’ll be able to administer almost every part of a WordPress site and do so incredibly fast.
- First, you want to connect to your server via SSH. Also, please note that it is ideal to not connect with the root user, otherwise you may get a warning about the security implications of running WP-CLI commands from the root account.
- Once you have access via SSH, now the commands are very simple. First, we are going to download the WordPress core.
I know that this might be a bit overwhelming at first when you have never done this. But as you get used to the entire process you will understand better how WordPress actually works.
Do you need to customize the theme of your blog? Well, in that case you can start by duplicating an exisiting theme and then tweaking it until you understand how to write your own themes. I would recommend downloading free themes and exploring them. Open the theme folders and see what is inside, examine how everything works together. To start, perhaps change some of the images so that they include now your logos and your colors.
I also recommend playing around with the entire platform. Log on to your WordPress install and make changes and explore how those changes have affected your site. Make sure that you click on every single thing you see; that is the only way you will become familiar with the platform and you’ll be confident on changing the different aspects of your site.
Alex Centeno MBA.
Creative Director & Digital Media Strategist @ Merkados


